Showing posts with label #blogger. Show all posts

Saturday, March 15, 2014

Great Photography Part 2

This week I devoted much attention and time to reading my new book "How to Create Stunning Digital Photography" by Tony Northrup.  I LOVE this book.  Just a few chapters into the book and my photos have improved tremendously.

Tony Northrup is a great instructor and writer.  The book includes several video clips that expound on the chapter information.  These videos of Tony Northrup are very helpful with example photos, demonstrations, and other tips and tidbits.

Here are some photos I've taken this past week.  A few of these photos were taken while practicing aperture (Chapter 4).  Others were photographed after reading Chapters 1-3 on controlling the background.

This week practice will include aperture, ISO, shutter speeds, and exposure compensation.  Wish me luck!!

 Going on a photo walk downtown was so much fun.  This photo was taken early in the morning before many of the tourists and business were up and going.  This is a very old building on our downtown square.  I adore the foreground focus with the blurred background (aperture!!).  


I think this part of the process will require more time and patience.  Fortunately, the book provides great "homework" and practice projects.  Yea!


This photo is of my daughter and her best friend.  They are standing on a cement wall dated August 5, 1911 looking into the overflow from our lake.


Here I practiced flower close-ups (aka simplifying the photo).  I think concentrating on the flower rather than the background really captures the beauty of the center and petals.


Next up, for me is to starting taking photos of new products.  I am so excited to use my new skills to take amazing product photos.

An added benefit is I am addicted to photography outside the shop.

This is a fun photo.  I never expected to "freeze" the water from the fountain.  The water drop and splashes really make this photo.


I ADORE my new hobby.  Looking forward to seeing your new photos.

Cheers!


Friday, March 7, 2014

Learning Awesome Photography

Of late I have been yearning to learn how to use my new camera properly.  I received a Nikon D3100 DSLR camera last year for my birthday.  It is the first DSLR I've owned and seemed like a great camera to start learning.


To date I have relied on the auto settings only because I don't know how to use the manual settings.  It is a completely foreign language!  Aperture, IOS, depth of field, and f-stops


But I am determined.  I love photography!  I love art and beautiful, interesting images.  And I want to capture some of those images myself.


Since receiving my camera (which I LOVE!) I have been fortunate to receive two more great lenses and a great tripod. 


Searching the Internet for "DSLR photography for beginners" brings up a slew of options.  But I really want something more than what I found.  I really wanted a at-my-own-pace course -- with assignments.  And I was looking for something that is easy to understand and teaches -- not tells - me how to take fantastic photos.


I really liked reading this course but wanted something with more practice and interactive options -  Digital Photography School


I am feeling pressure and a time crunch, however.  My niece is getting married in a few months and the bridal shower in right around the corner.  My goal is to learn and practice indoor shots to capture the shower while honing my outdoor shots for the wedding.  Tall order!


To help with the learning process, and after a visit to my local library, I found a highly recommended book with video on Amazon. 


So, to start my learning process I downloaded "How to Create Stunning Digital Photography" by Tony Northrup. 


Starting Chapter 1 I already love this book.  In the download copy I can click on videos to get more information.


Fabulous!!


Today, I am out in the field with my husband with the intention to practice what I'm learning.  This should be a lot of fun and I can't wait to share with you.


This learning process will be terrific for my Etsy shop and photographing jewelry pieces to show their best attributes.


Cheers!


Friday, February 14, 2014

Jewelry Cleaning and Care Tips

It can be frustrating for a favorite piece of jewelry to become soiled and not know how to clean it.  Or for a lovely piece of sterling silver to tarnish and be fearful to clean it.


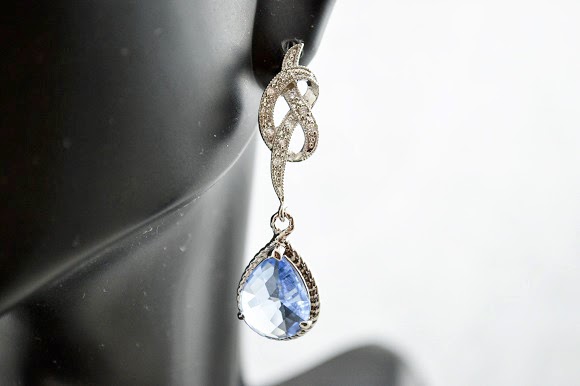
Ice Blue Silver Rhodium and Cubic Zirconia Dangles


Here's a quick and easy guide, courtesy of Tiffany, to help care for your precious metals, semi-precious, and precious gemstones. 

Antique Silver Iolite & Citrine Dangle


General Care
Over time, fine jewelry can become a treasured family heirloom if it is cared for properly. Dust, pollution and daily wear all conspire to cloud the brilliance of gemstones. The surface of gold, platinum and silver jewelry can become dulled. Timeworn prongs and clasps can result in the loss of a stone or an entire piece of jewelry.

Professional cleanings are recommended as often as once a year. 

Tangerine Orange, Rhodium Silver, and Cubic Zirconia Dangles


Sterling Silver
Sterling silver, one of the most beautiful and lustrous of all metals will tarnish over time. With proper care, your silver will retain its beauty and character for many generations to come.  Other options are rhodium which protects the silver from tarnish.
The First Rule Of Silver Care
Sterling silver tarnishes, especially when exposed to salt air and products containing sulfur, such as rubber bands and some papers. However, silver that is regularly used typically needs less care.  Use or wear your silver every day.
Washing Silver
Wash silver by hand in warm water with a mild detergent. Because many food acids and gases in the air can have a corrosive effect, we suggest that you wash your silver immediately after use. To avoid spotting, it is important to dry your silver immediately after washing. 

Sapphire Blue Rhodium Silver, Cubic Zirconia Dangles


Gold, Platinum
Between professional servicing, most gold and platinum jewelry can be maintained with a non-abrasive cleaner. Examine your jewelry regularly to make sure settings are snug and clasps and joints are secure.

Avoid exposing gold jewelry to household bleach, which will quickly cause gold to discolor and possibly disintegrate.

Jewelry storage is important as well. Use a protective box, case, or tarnish-resistant pouch. Between wearings, place it back in its original case or another suitably lined box or pouch. 

Various Gemstone and Gold-Filled Bangles


Gemstones
Certain basic precautions should be taken with all of your jewelry. However, some gemstones, as outlined in this section, require special care.

Take care to protect your jewelry from impact against hard surfaces and avoid contact with abrasive surfaces. Even a diamond can chip if hit with enough force or at just the right angle. Many stones such as amethyst, emerald, kunzite, opal, pearl, peridot, tanzanite and tourmaline are very delicate and easily abraded. Enamel can also chip or scratch when struck. Gemstones can scratch other gemstones and wear away at precious metals. Therefore, avoid stacking those rings and bracelets that would be vulnerable to such abrasion. Extreme temperatures, perfumes, cosmetics, ultrasonic cleaning and household chemicals can also damage jewelry.

To clean diamonds, use a mild solution of six parts water to one part ammonia and apply with a soft bristle brush.

If worn often, pearls should be cleaned and restrung professionally once a year. Between cleanings, wipe pearls gently with a damp cloth.

Leather
External elements such as excessive heat or moisture can affect the overall look of your accessory. Following proper care and storage guidelines will ensure the longevity of this exceptional product. When not in use, store your item in the protective dust bag provided.
Calf And Grain Leather
Leather has inherent slight variations and imperfections, which are normal and add to the beauty of each piece. The grain leather is treated naturally, so color and texture may change over time, darkening and softening to create an elegant patina. If scuffs or bruises occur, rub the affected area with a soft, dry white cloth. 
Now wear that jewelry and look stunning!


Saturday, January 25, 2014

Chalkboard DIY - French Country Style

Chalkboard is a very hot trend.  No wonder!  It is stylish, functional, and versatile.  Did I mention fun?  Yes, it's really fun. 


Tap your creativity to place chalkboard details in your house.  I am very excited about this project.  I think you will love it too.


I found this great mirror and frame at my local thrift shop.  The shape and details on the frame fit the French Country theme of my kitchen.  And it was 40% off an already incredibly great price!  Score!

First, I took the back and mirror out of the frame.  I'll store the mirror until I decide where to use it in the house.

Then I sanded and painted the frame.  I used the same silver / gray color I painted my kitchen cabinets.  It is a great color because it is not white but not dark gray either.  A perfect neutral.

French Robin Designs

While that dried I cut a piece of backer board ($8 for a 48" x 48" sheet) the shape of the mirror to fit the frame.  It was very easy to cut with a jigsaw (yea! power tools!!!!).

The backer board was primed with a color blocking primer I had from my cabinet redo.  

Time for the chalkboard paint!  I used a foam roller for cabinets because I didn't want brush strokes.  But a brush will work just as well if you don't mind the texture.  The roller left a texture that I really wanted -- like old school chalkboards.  Spray chalk board paint is available too.


I chose Rust-Oleum simply because it was there.  I didn't really spend a lot of time deciding on the paint.  Rust-Oleum is a great, reliable brand so I thought it would be a good choice for my project. 

Two coats of chalkboard paint, overnight drying time, and it was ready to mount in the frame.

This is the end result.  I LOVE this chalkboard.  It only cost me about $45 in materials.  A great buy when they are selling for over $100 for something much smaller.  It is placed in my kitchen -- the central part of the house!  The kids are sure to see my notes.  I'm looking forward to writing menus on the board (eliminate the "what's for dinner" question) and little notes for the kids.


Finished chalkboard.  Letter Y purchased from Woodland Manufacturing.


The green-blue letter Y (for my last name) was purchased some time ago from Woodland Manufacturing.  It is a great company... many letters styles to chose from, colors, hanging methods, etc.  

Use your creativity, experiment, and have fun with chalkboard paint.  Can't wait to see what you create!

Cheers -- Tammi